
Classic Peanut Butter Cookies: A Timeless Treat
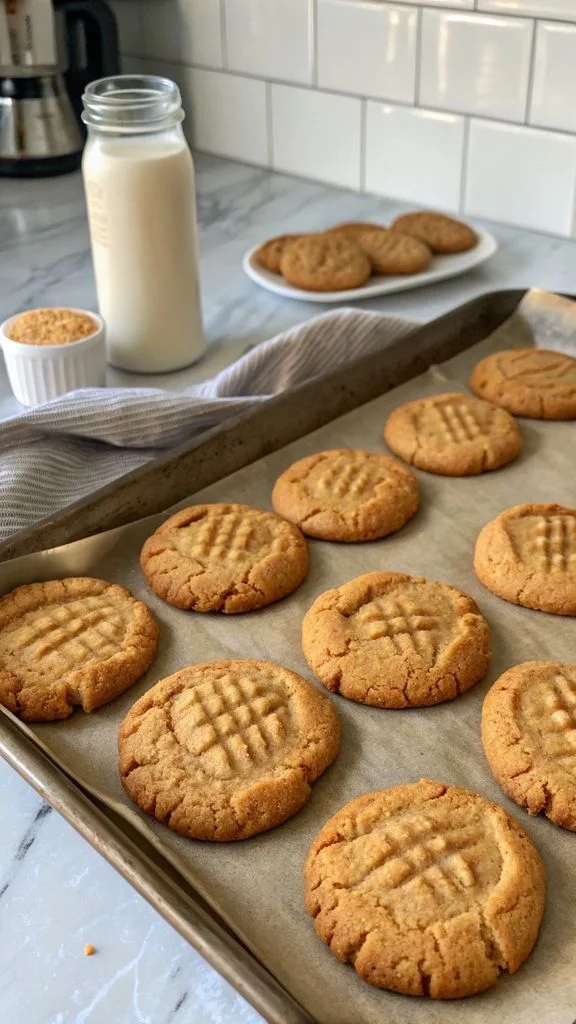
There’s something undeniably magical about the aroma of peanut butter cookies baking in the oven—a warm, nutty fragrance that instantly feels like home. As a child, I’d perch on a stool in my grandma’s kitchen, watching her press crisscrosses into each dough ball with the tines of a fork. Those humble cookies, with their sandy texture and melt-in-your-mouth sweetness, were my first baking triumph. Peanut butter cookies trace their roots to the early 1900s, when peanut butter emerged as a pantry staple in American households. By the 1930s, recipes appeared in community cookbooks nationwide, often as a thrifty way to stretch ingredients during the Great Depression. Today, they’re a cultural icon—synonymous with lunchbox nostalgia, holiday cookie swaps, and cozy after-school snacks. Their signature fork-patterned tops and rich flavor make them universally beloved, whether you’re a busy parent or an aspiring pastry chef. In this recipe, we’re honoring tradition while perfecting the balance of crisp edges, chewy centers, and pure peanut bliss. Take a peek at the golden-brown beauties in the image below—they’re exactly what we’re aiming for!
Why You’ll Love This Recipe
- Effortless & Quick: With just one bowl and under 30 minutes of active prep, these cookies are perfect for spontaneous baking sessions.
- Allergy-Friendly Flexibility: Easily adaptable for dietary needs—swap in sunflower seed butter or gluten-free flour without sacrificing texture.
- Crowd-Pleasing Guarantee: From kids to grandparents, these classics disappear fast. Their nostalgic charm sparks smiles every time.
- Freezer-Friendly Dough: Whip up a batch ahead and bake cookies on demand for fresh-from-the-oven warmth anytime.
Ingredients
Measure precisely for consistency; ingredient quality matters!
- 1 cup (250g) smooth peanut butter: Use conventional brands like Jif or Skippy—natural varieties can make cookies greasy.
- ½ cup (113g) unsalted butter, softened to room temperature
- 1 cup (200g) light brown sugar, packed: Adds moisture and caramel notes.
- ½ cup (100g) granulated sugar
- 1 large egg + 1 egg yolk, room temperature: The yolk boosts richness.
- 2 tsp pure vanilla extract
- 1 ¾ cups (220g) all-purpose flour: Spoon and level to avoid dense cookies.
- 1 tsp baking soda
- ½ tsp baking powder
- ½ tsp fine sea salt: Balances sweetness.
- Optional: ½ cup (85g) chocolate chips or chopped peanuts for texture.
Equipment Needed
- Stand mixer or hand mixer
- Large mixing bowl
- Whisk and rubber spatula
- Baking sheets (light-colored for even browning)
- Parchment paper or silicone mats
- Fork (for crisscross pattern)
-
40 cookie scoop (1.5 Tbsp) for uniform sizing
- Wire cooling rack
Step-by-Step Instructions
(Total time: 1 hour, including chilling; yields 24 cookies)
- Prep & Preheat: Line two baking sheets with parchment paper. Preheat oven to 350°F (177°C). Tip: Oven thermometers ensure accurate temps!
- Cream Butter & Sugars: In a large bowl, beat softened butter, peanut butter, brown sugar, and granulated sugar on medium-high for 2–3 minutes until fluffy. Scrape the bowl halfway. The mixture should look pale and creamy—see the image below for reference.
- Add Wet Ingredients: Beat in the whole egg, egg yolk, and vanilla until fully incorporated.
- Combine Dry Ingredients: In a separate bowl, whisk flour, baking soda, baking powder, and salt.
- Mix Dry into Wet: Gradually add dry ingredients to the wet mixture on low speed. Mix just until no flour streaks remain. Overmixing = tough cookies! Fold in chocolate chips if using.
- Chill Dough: Cover dough and refrigerate for 20 minutes. This prevents overspreading and deepens flavors.
- Shape Cookies: Use a cookie scoop to portion dough into 1.5-Tbsp balls. Roll gently between palms.
- Crisscross & Bake: Place balls 2 inches apart on sheets. Press a fork into each ball vertically, then horizontally to flatten slightly. For decorative flair, dip the fork in sugar between presses.
- Bake: 10–12 minutes until edges are golden and centers look slightly underdone. Rotate pans halfway for even baking.
- Cool: Let cookies rest on sheets for 5 minutes before transferring to a wire rack to cool completely. They’ll firm up as they cool!
Tips for Perfect Results
- Butter Temperature: Softened butter should indent lightly when pressed—not melted or cold.
- Measure Flour Correctly: Fluff flour, spoon into a measuring cup, then level with a knife.
- Chill Dough: Non-negotiable! Cold dough retains shape during baking.
- Space Cookies: Crowding causes uneven baking. Use multiple sheets if needed.
- Don’t Overbake: Remove cookies when centers look soft but set. They’ll firm up off the heat.
Storage and Make-Ahead Instructions
- Room Temp: Store in an airtight container for up to 1 week (add a bread slice to maintain softness).
- Freeze Dough: Portion chilled dough balls onto a tray, freeze solid, then transfer to a zip-top bag. Bake from frozen, adding 1–2 minutes to bake time.
- Freeze Baked Cookies: Layer cooled cookies between parchment in a container for up to 3 months. Thaw at room temp.
Variations and Substitutions
- Flourless & Gluten-Free: Replace flour with 1:1 gluten-free baking blend or use 2 cups almond flour + ¼ tsp xanthan gum.
- Crunchy Peanut Butter: Swap smooth for crunchy PB and add ¼ cup chopped peanuts for extra texture.
- Chocolate-Dipped: Melt dark chocolate with coconut oil, dip half of each cooled cookie, and sprinkle with sea salt.
- Sugar-Free: Use monk fruit sweetener blend 1:1 for both sugars and sugar-free peanut butter.
Maddy’s Tips for Success
(From my 15 years of cookie testing!)
– Quality PB Matters: Avoid natural or oily brands; conventional gives perfect structure.
– Eggs at Room Temp: Ensures even emulsification for a tender crumb.
– Press Gently: Flatten dough balls to ½-inch thickness—too thin = crisp, too thick = cakey.
– Bake on Parchment: Prevents sticking and promotes even browning.
Frequently Asked Questions
Can I use natural peanut butter?
Natural PB often separates and lacks stabilizers, leading to greasy, flat cookies. Stick with conventional for reliability.
Why did my cookies spread too much?
Likely causes: dough not chilled, hot butter, or expired leaveners. Double-check each step!
How do I get ultra-chewy cookies?
The extra egg yolk and brown sugar are key. Bake until edges are just golden—centers should look slightly underbaked.
Can I make these without a mixer?
Absolutely! Use a sturdy spatula and elbow grease. Cream butter and sugars vigorously for 5 minutes.
Why the fork press?
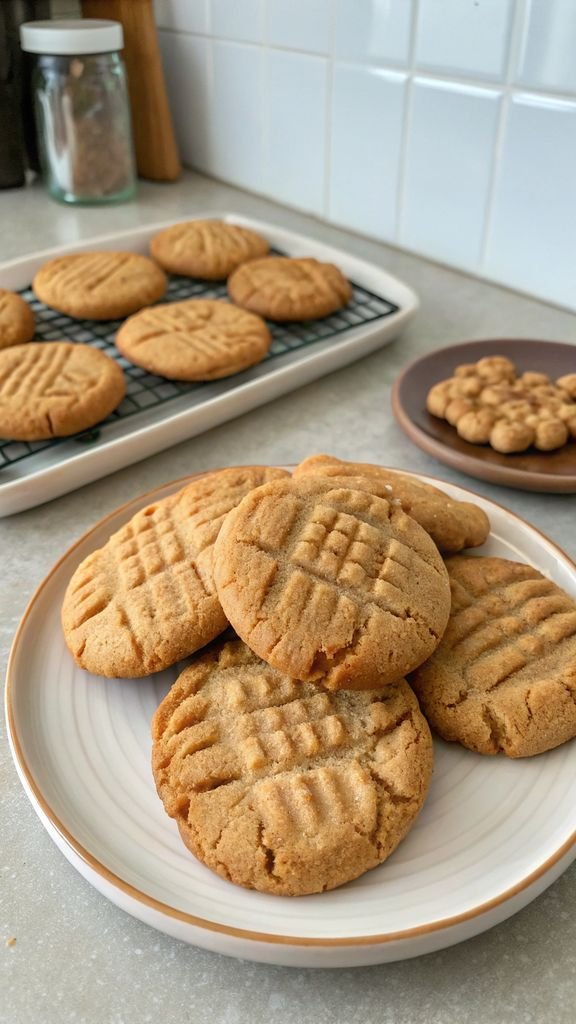
It ensures even baking and creates that iconic texture. Plus, it’s tradition! The image above showcases the perfect crisscross pattern.
Nutrition Information
Each cookie (plain) contains roughly:
– Calories: 180
– Protein: 4g
– Healthy Fats: 10g (monounsaturated from PB)
– Fiber: 1g
Peanut butter provides protein, vitamin E, and heart-healthy fats. Enjoy in moderation as a balanced treat!
Serving Suggestions
- Ice Cream Sandwiches: Press a scoop of vanilla ice cream between two cookies. Roll edges in mini chocolate chips.
- Dessert Charcuterie: Pair with dark chocolate chunks, dried fruit, and a drizzle of salted caramel on a sharing board.
- Coffee Companion: Serve warm cookies alongside cold milk or espresso. Notice in the photo how the crinkly edges glisten—they’re begging to be dunked!
There you have it—the ultimate peanut butter cookie recipe that balances simplicity with bakery-quality results. Share these with loved ones, stash some in the freezer for emergencies, or savor one (or three) with your afternoon coffee. Tag me on social media with your creations—I love seeing your kitchen wins! 🥜✨