
Decadent Chocolate Truffles: A Simple Guide to Luxurious Homemade Confections
There’s something undeniably magical about biting into a chocolate truffle—that moment when the smooth, velvety shell gives way to an impossibly rich ganache center. Born in 1920s France when pastry apprentice Louis Dufour needed a last-minute Christmas confection, truffles earned their name from their striking resemblance to the prized underground fungi foraged in the French countryside. What began as a happy accident has become a global symbol of indulgence, with each culture adding its own twist: Belgians perfected the hard shell, Swiss introduced creamier textures, and Americans embraced wild flavor innovations. Today, these bite-sized luxuries represent more than just chocolate—they’re edible tokens of celebration, comfort, and connection. As you’ll see in the photo above, homemade truffles have an artisanal charm that store-bought versions can’t match, with imperfectly perfect shapes whispering, “Made with love.” Whether you’re a kitchen novice or seasoned baker, mastering truffles unlocks a world where five simple ingredients transform into gilded gifts, dinner party showstoppers, or just a very good Tuesday.
Why You’ll Love This Recipe
- Effortless Elegance: With no special skills required, you’ll create confections that look and taste like they came from a Parisian chocolatier.
- Endless Creativity: Once you master the basic ganache, a universe of flavors opens up—from zesty citrus to aromatic spices.
- Gift-Giving Gold: Handmade truffles wrapped in pretty boxes or jars make heartfelt presents that cost a fraction of store prices.
- Time-Smart: The active preparation takes just 20 minutes, with most work done by your fridge. Plus, they freeze beautifully for instant treats!
Ingredients
Quality matters! Use the best ingredients you can find for truffles this simple.
– 12 oz (340g) high-quality dark chocolate (60-70% cacao), finely chopped (Valrhona or Guittard recommended)
– 1 cup (240ml) heavy cream (avoid ultra-pasteurized for best texture)
– 4 tbsp (56g) unsalted butter, cubed and at room temperature
– 2 tsp pure vanilla extract (or substitute 1 tsp vanilla bean paste)
– ¼ cup (20g) unsweetened cocoa powder, for coating (Dutch-processed preferred)
– ½ cup (60g) finely chopped roasted hazelnuts (or almonds, pecans)
– ¼ cup (25g) freeze-dried raspberry powder (optional, for tangy variation)
– Pinch of sea salt (flaky Maldon salt elevates flavors)
Equipment Needed
- Heavy-bottomed saucepan
- Heatproof glass or metal bowl
- Silicone spatula
- Whisk
- Baking sheet
- Parchment paper
- Small cookie scoop (1-inch diameter) or teaspoon
- 2 shallow bowls for coatings
- Fork or dipping tools
Step-by-Step Instructions
(Prep time: 20 min | Chill time: 4 hours | Total time: 4.5 hours | Yields 30 truffles)
-
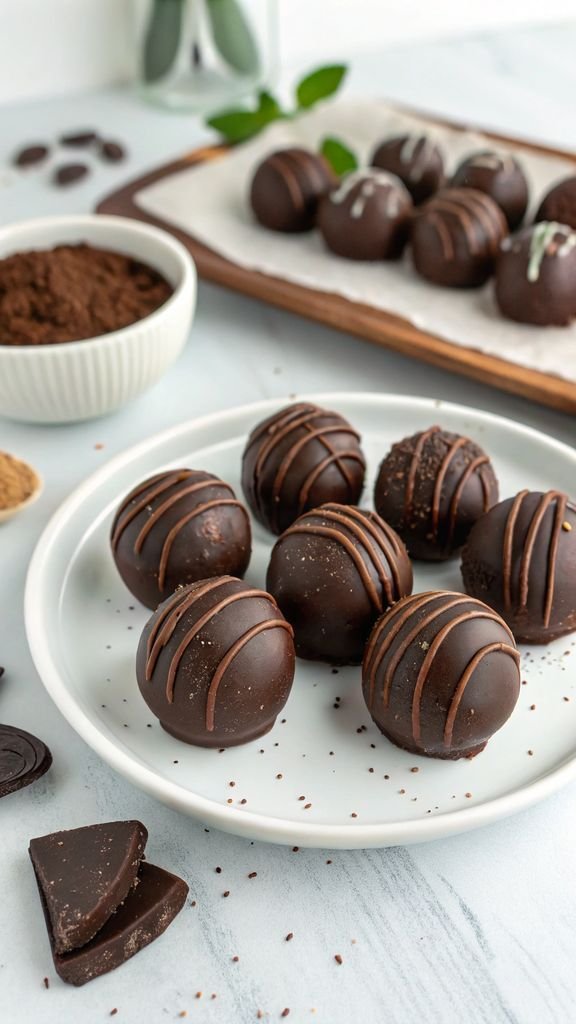
Prep Your Workspace: Line a baking sheet with parchment paper. Chop chocolate into uniform pea-sized pieces—this ensures even melting. Place in a heatproof bowl with butter and vanilla. As shown in the preparation photo, uniform chopping is key to silky results.
-
Heat the Cream: Pour cream into a saucepan. Warm over medium heat until it reaches a gentle simmer—you’ll see small bubbles form around the edges (about 180°F/82°C). Don’t boil! Scalded cream makes grainy ganache.
-
Melt the Chocolate: Immediately pour hot cream over chopped chocolate. Let sit undisturbed for 60 seconds to soften the chocolate, then whisk gently from the center outward until smooth and glossy. If any unmelted bits remain, create a double boiler by placing the bowl over simmering water (don’t let bowl touch water) and whisk until melted.
-
Emulsify: Add room-temperature butter one cube at a time, whisking until fully incorporated. The ganache should resemble dark satin. Taste and add a pinch of salt if desired.
-
Chill the Ganache: Pour mixture onto the parchment-lined baking sheet, spreading to ½-inch thickness. Cover with plastic wrap pressed directly onto the surface (prevents skin formation). Refrigerate 3-4 hours until firm enough to scoop. Tip: Speed this up by freezing for 45 minutes.
-
Scoop and Shape: Using a 1-tsp scoop or spoon, portion ganache. Roll quickly between palms to form balls (wear food-safe gloves if hands are warm). Work in batches, returning ganache to fridge if it softens. Don’t worry about perfect spheres—truffles are meant to look rustic!
-
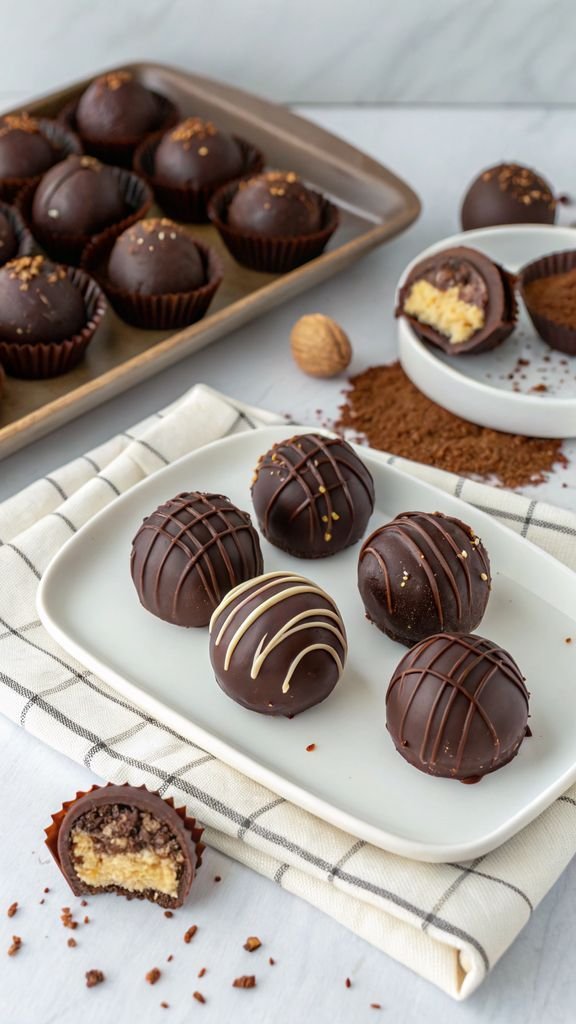
Apply Coatings: Place cocoa powder, chopped nuts, or raspberry powder in shallow bowls. Roll truffles gently to coat. For double coatings, dip first in melted chocolate (see variations), then roll in toppings.
-
Final Set: Arrange finished truffles on parchment. Chill 15 minutes to firm coatings. As the photo illustrates, the textured exteriors create beautiful visual contrast.
Tips for Perfect Results
- Chocolate Quality is Non-Negotiable: Couverture chocolate (with 32-39% cocoa butter) yields superior fluidity and snap.
- Control Temperature: If ganache “breaks” (looks oily), whisk in 1 tsp room-temp cream to re-emulsify.
- Scoop While Firm: Ganache should be as hard as cold butter. Too soft? Freeze 10 minutes.
- Prevent Melting: Handle truffles minimally and chill hands under cold water before shaping.
- Avoid Humidity: Coatings become sticky in humid environments—work in an air-conditioned room.
Storage and Make-Ahead Instructions
Store truffles in an airtight container between parchment layers. They keep for:
– Fridge: 2 weeks
– Freezer: 3 months (thaw overnight in fridge)
Make-ahead tip: Unglazed ganache balls freeze beautifully for 2 months. Thaw 10 minutes before coating.
Variations and Substitutions
- Citrus Burst: Replace vanilla with 1 tbsp orange zest + 2 tbsp fresh orange juice.
- Mocha Magic: Whisk 1 tbsp instant espresso powder into warm cream.
- Dipped Truffles: Melt 8 oz dark chocolate + 1 tbsp coconut oil. Dip chilled ganache balls using a fork, tap off excess, and set on parchment.
- Coconut Bliss: Roll in toasted coconut flakes instead of cocoa powder.
Maddy’s Tips for Success
From my decade of truffle-making disasters and triumphs:
– Rescue seized chocolate by adding ½ tsp vegetable oil while melting
– Roll truffles in a mesh strainer for ultra-smooth cocoa dusting
– Infuse cream with herbs (lavender, mint) by steeping 10 minutes pre-heating—strain before use
– Always do a “test truffle” before rolling the whole batch to check consistency
Frequently Asked Questions
Q: Can I use milk chocolate instead of dark?
A: Absolutely! Reduce cream to ¾ cup since milk chocolate has more dairy. Avoid white chocolate—it lacks cocoa solids for stable ganache.
Q: Why did my truffles turn out grainy?
A: Likely causes: overheated cream (scorches chocolate), insufficient chopping, or whisking too vigorously. Always simmer cream gently and stir minimally.
Q: How do I fix ganache that won’t set?
A: Chill longer. If still soft after 6 hours, remelt gently over simmering water, add 1 oz extra chopped chocolate, and rechill.
Q: Can I make these vegan?
A: Yes! Use full-fat coconut cream and vegan dark chocolate. Replace butter with 1 tbsp refined coconut oil.
Q: What’s the white film on my truffles?
A: “Bloom” occurs when cocoa butter rises to the surface. Harmless but unattractive. Prevent by storing away from temperature fluctuations.
Nutrition Information
While truffles are indulgences, dark chocolate boasts antioxidants like flavonoids (linked to heart health) and minerals (iron, magnesium). Moderation is key—one truffle contains about 80 calories, 6g fat, and 5g sugar. Balance with nuts for healthy fats.
Serving Suggestions
- Dessert Platter: Arrange on a slate board with dried orange slices and edible flowers.
- Coffee Pairing: Serve alongside espresso—the bitterness contrasts the sweetness perfectly.
- Gift Jars: Layer in clear jars with parchment between tiers. Tie with ribbon and a handwritten tag.
As you savor your first homemade truffle, notice how the rich center melts luxuriously on your tongue—a little victory dance for your tastebuds. These aren’t just candies; they’re edible proof that simple ingredients can create joy. So share them generously, experiment fearlessly, and remember: in chocolate, as in life, the messiest creations often hold the sweetest rewards.
Printable Recipe Card
Want just the essential recipe details without scrolling through the article? Get our printable recipe card with just the ingredients and instructions.